การทำ Distributed load test บน Kubernetes cluster
ในตัวอย่างนี้เราจะ deploy locust ลงใน kubernetes cluster เพื่อทำ distributed load test ซึ่งประโยชน์ของการใช้ locust ใน Kubernetes cluster คือ
- ทำ distributed load test
- สามารถทดสอบ services ต่างๆที่อยู่ใน Kubernetes ได้
- สามารถทดสอบ services ทุกๆ services ใน Kubernetes จากภายใน cluster ไม่ต้องผ่าน ingress

Distributed load test
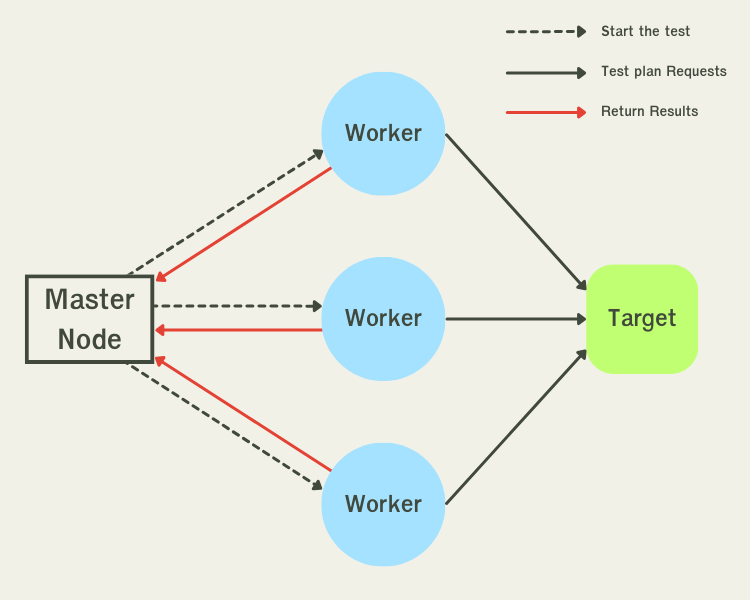
distributed load test คือการทำ load test ที่ส่ง request มาจากหลายๆที่ ซึ่งในกรณีเราจะทำการส่ง request ออกมาจาก containers ที่อยู่ในแต่ละ Pods ซึ่งถ้าเราใช้ locust ใน Kubernetes เราจะสามารถ generate transaction ได้มากกว่าใช้ผ่าน command line แบบปกติ

Master จะเป็นคนออกคำสั่งให้เริ่มทำ load test ซึ่งหลังจากได้รับคำสั่งให้ start load test Worker แต่ละ node จะส่ง request ออกไปยัง target(application ที่เราต้องการทดสอบ) ซึ่งหลังจากได้ response กลับมา locust จะนำผลลัพธ์ที่ได้กลับไปรวมไว้ที่ Master
Step 1. Deploy Application(Target)
ก่อนอื่นเราต้องทำการ deploy application หรือ services ที่เราต้องการทดสอบลงไปใน Kubernetes ก่อนโดยเริ่มจากการ clone ตัวอย่างจาก
$ git clone https://github.com/eon01/kubernetes-locust-example.git
หลังจากนั้นก็ทำการ deploy application ที่ต้องการทดสอบลงไปใน Kubernetes cluster(เราต้องมี Kubernetes cluster ก่อน)
$ cd guestbook
$ kubectl apply -f .
หลังจากจบ step ที่ 1 เราจะได้โครงสร้างของ file เป็นแบบนี้
├── guestbook
│   ├── frontend-service.yml
│   ├── frontend-deployment.yml
│   ├── redis-master-deployment.yml
│   ├── redis-master-service.yml
│   ├── redis-slave-deployment.yml
│   ├── redis-slave-service.yml
Step 2. สร้าง locustfile ขึ้นมา
สร้าง locustfile ขึ้นมาแล้วทำการเขียน python script ในตัวอย่างนี้จะเก็บไว้ใน folder docker/locust-tasks ที่ใส่ไว้ใน folder docker เพราะเดี๋ยวเราจะต้องมี Dockerfile และ shell script เพื่อกำหนด parameters ของ locust cli ในขั้นตอนต่อไป เพื่อให้ง่ายต่อการค้นหาผมเลยรวมไฟล์ของ docker ทั้งหมดไว้ใน folder เดียวกัน
from locust import HttpUser, task, between

class MyUser(HttpUser):
   wait_time = between(5, 15)

    @task
    def index(self):
       self.client.get("/")
    @task
    def update(self):
       self.client.get("/guestbook.php?cmd=set&key=messages&value=,JohnDietish,")
หลังจาก Step ที่ 2 แล้วเราก็จะได้โครงสร้างของ file แบบนี้(เพิ่ม requirement.txt และ Locustfile)
├── docker
│   ├── locust-tasks
│   |   ├── Locustfile
│   |   ├── requirement.txt
├── guestbook
│   ├── ...
Step 3. สร้าง Locust docker image
สร้าง Dockerfile เพื่อนำ Locustfile และ run.sh เข้าไปใน container โดยที่เนื้อหาของ Dockerfile จะมีดังนี้
FROM locustio/locust:1.2.3

# นำ locustfile ที่อยู่ใน folder locust-tasks เข้าไปไว้ใน container
COPY locust-tasks /locust-tasks
COPY run.sh .

# ติดตั้ง package ที่ต้องใช้ในการ run locustfile
RUN pip install -r /locust-tasks/requirements.txt

# เปลี่ยนให้ run.sh สามารถ execute ได้(755)
User root
RUN chmod 755 run.sh
# หลังจากเปลี่ยน user เป็น root แล้วให้เปลี่ยนกลับมาเป็น user ที่มีสิทธิต่ำเสมอ
User locust

# สั่งให้ run.sh ทำงาน
ENTRYPOINT ["bash", "./run.sh"]
Dockerfile นี้จะเรียก run.sh เพื่อ start node ต่างๆ โดยจะใช้ตัวแปร LOCUST_OPTS เป็นตัวกำหนด target และใช้ LOCUST_MODE เป็นตัวกำหนดว่าเป็น master หรือ worker
|
|
หลังจากที่สร้าง Dockerfile และ run.sh ขึ้นมาแล้วโครงสร้างของ file จะเป็นแบบนี้
├── docker
│   ├── locust-tasks
│   |   ├── ...
│   ├── Dockerfile
│   ├── run.sh
├── guestbook
│   ├── ...
หลังจากนั้นให้ลอง build docker image ขึ้นมาบน local ด้วยคำสั่ง
$ cd docker
$ docker build -t locust:guestbook
Step 4. Deploy Locust ลงไปใน Kubernetes
เราต้องทำการ deploy locust ลงไปใน Kubernetes โดยใช้ distributed mode ซึ่งใน Kubernetes resources จะประกอบไปด้วย
- Locust master deployment เราจะสร้าง Master ไว้ 1 Pod
- Locust master service ใช้สำหรับกำหนด MASTER_URL
- Locust worker deployment เราจะสร้าง Worker ไว้ 3 Pods
โดยที่เราจะเก็บไฟล์ทั้ง 3 ไฟล์นี้ไว้ใน folder k8s โดย path ของ file จะเป็นแบบนี้
├── docker
│   ├── locust-tasks
│   |   ├── ...
│   ├── Dockerfile
│   ├── run.sh
├── guestbook
│   ├── ...
├── k8s
│   ├── locust-mater-deployment.yml
│   ├── locust-master-service.yml
│   ├── locust-worker-deployment.yml

Locust Master Deployment
ใน Kubernetes Deployment ในบรรทัดที่ 21-22 เราจะกำหนด LOCUST_MODE เป็น master ซึ่งจะเข้าเงื่อนไขในบรรทัดที่ 8 ของ run.sh
|
|
กำหนด TARGET_HOST ยังไง?
เนื่องจากไฟล์ตัวอย่าง frontend-service.yml(อยู่ใน folder guestbook) ที่เรานำมาใช้จะระบุชื่อ service ของ guestbook application ไว้ในบรรทัดที่ 4 เวลาที่เราระบุ target เราถึงต้องใช้ TARGET_HOST เป็น http://frontend-internal
|
|
Locust Master Service
ใน Kubernetes Service ของ Master จะเป็น resource ที่ระบุ MASTER_URL เพื่อให้ Worker สามารถ connect เข้ามายัง Master ได้
|
|
Locust Worker Deployment
ใน Kubernetes Deployment สำหรับ Worker นั้นจะกำหนด replicas ไว้เป็น 3 นั่นหมายความว่าจะมี container ที่ทำการส่ง request ไปยัง target อยู่ 3 ตัวด้วยกัน ซึ่งใน container แต่ละตัวจะกำหนด Environment Variables ไว้ดังนี้
- LOCUST_MODE กำหนดเป็น worker
- LOCUST_MASTER_URL สำหรับ URL ของ master เราจะระบุตาม Locust Master Service ที่ได้ระบุไว้ในหัวข้อก่อนหน้า
- TARGET_HOST เราจะระบุตามชื่อของ service ที่ได้ deploy ไว้ในไฟล์ frontend-service.yml
|
|
เมื่อสร้าง Manifest file ครบแล้วก็ทำการ deploy ทุกๆไฟล์ลงไปใน kubernetes ด้วยคำสั่ง
$ cd k8s
$ kubectl apply -f .
Step 5. Running test
เมื่อทำครบทุกขั้นตอนแล้วเราก็จะทำการ run load test กันซักที ซึ่งเราต้อง forward port จากข้างนอกเข้าไปใน Locust Master ด้วยคำสั่ง
$ kubectl port-forward svc/locust-master-web 8089:8089
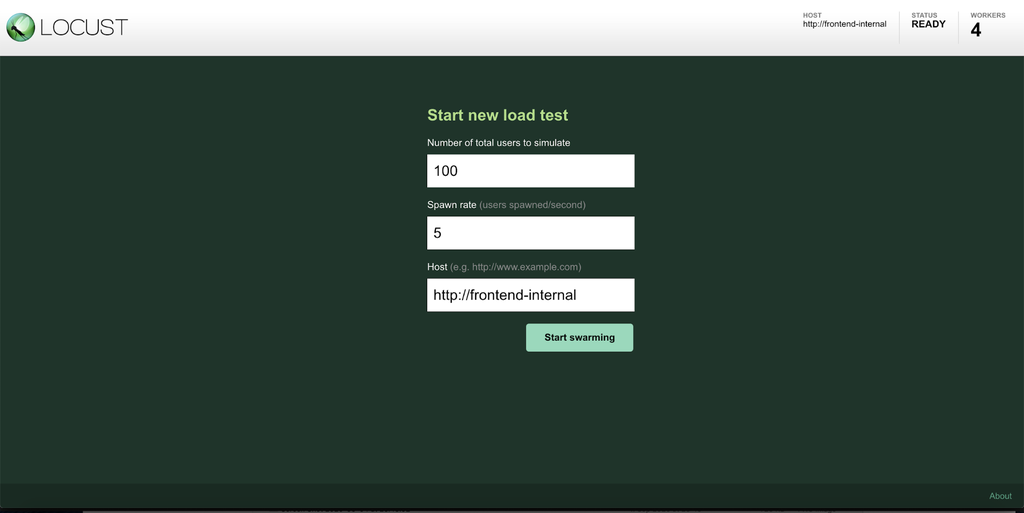
เมื่อเข้าหน้าแรกได้แล้วก็เริ่ม start new load test และกำหนด parameters ต่างๆ ดังนี้
- Number of users ใส่จำนวนของ users ที่เข้าไปพร้อมกันมากที่สุด(Peak concurrent users) ในตัวอย่างนี้จะกำหนดเป็น 100 users
- Spawn rate จำนวน users ที่ start task ขึ้นมาทำงานภายใน 1 วินาที ในตัวอย่างนี้จะกำหนดเป็น 5 users
- Host Base URL ของ target ในตัวอย่างนี้เราจะต้องใส่เป็น http://frontend-internal (เพราะ locust run อยุ่ใน kubernetes cluster)

หลังจากนั้นเราก้จะได้ผลลัพธ์ ดังรูป


