ขั้นตอนการติดตั้ง Gitlab ลงบน Linux
ในบทความนี้เราจะเริ่มมาลองติดตั้ง Gitlab ลงบน linux ซึ่งในตัวอย่างเราจะแนะนำการติดตั้งลงบน Ubuntu และ Redhat ซึ่งถือได้ว่าเป็น linux ยอดนิยม เหมาะสำหรับผู้ที่ต้องการติดตั้ง Gitlab ไว้ใช้ภายในองค์กรด้วยตัวเอง
ติดตั้ง Gitlab ลงบน Ubuntu
ขั้นตอนที่ 1 เริ่มจากการติดตั้ง dependencies ต่างๆ
ในขั้นตอนนี้จะทำการติดตั้งสิ่งที่จำเป็นต้องมีในการใช้งาน Gitlab ซึ่งเราจะใช้คำสั่ง
# ทำการ update ubuntu กันก่อน
sudo apt-get update

# ติดตั้ง curl, openssh, ca-certificate, tzdata และ perl
sudo apt-get install -y curl openssh-server ca-certificates tzdata perl
โดย package มีอยู่ 2 packages ที่ค่อนข้างจะแปลกตา ซึ่ง 2 packages นี้จะทำหน้าที่ ดังนี้
- ca-certificate ใช้สำหรับการสร้่ง ssl connection
- tzdata ใช้สำหรับจัดการกับ timezone
ขั้นตอนที่ 2 ติดตั้ง Gitlab
โดยขั้นตอนนี้เราจะทำการตรวจสอบ dependencies และ เพิ่ม repository เข้าไปใน source list ด้วยคำสั่งนี้
curl https://packages.gitlab.com/install/repositories/gitlab/gitlab-ce/script.deb.sh | sudo bash
สามารถเปลี่ยน url จาก gitlab-ce เป็น gitlab-ee ได้ถ้าต้องการทดลอง enterprise edition
หลังจากนั้นเราก็จะทำการติดตั้่ง gitlab ด้วยคำสั่ง
sudo apt-get install gitlab-ce
ขั้นตอนที่ 3 กำหนดต่า configuration
โดย deafault gitlab จะกำหนดค่า baseurl ไว้เป็น https://gitlab.example.com ดังนั้นถ้าเราต้องการจะเข้าถึง gitlab ผ่าน url แบบนี้สิ่งที่เราต้องมีคือ
- มี DNS ให้ทำการสร้าง A record ไว้เป็น domain สำหรับหรับการเข้าถึง gitlab
- มี certificate สำหรับการเข้าถึงผ่านทาง https
นอกจากนี้เรายังสามารถกำหนด configuration อื่นๆ ที่อยู่ในไฟล์ /etc/gitlab/gitlab.rb ยกตัวอย่างเช่นการ set SMTP server สำหรับการส่ง notification ผ่านทาง email
ถ้าเรามี smtp server ติดตั้งอยู่ใน server เดียวกัน เช่นในเครื่องมี postfix เราจะใช้แค่
gitlab_rails['smtp_enable'] = true
แต่ถ้าเราต้องเชื่อมต่อกับ smtp server ที่อยู่บน server คนละตัวเราจะใช้
gitlab_rails['smtp_enable'] = true
gitlab_rails['smtp_address'] = "smtp.server"
gitlab_rails['smtp_port'] = 465
gitlab_rails['smtp_user_name'] = "smtp user"
gitlab_rails['smtp_password'] = "smtp password"
gitlab_rails['smtp_domain'] = "example.com"
gitlab_rails['smtp_authentication'] = "login"
gitlab_rails['smtp_enable_starttls_auto'] = true
gitlab_rails['smtp_openssl_verify_mode'] = 'peer'

#เราสามารถเปลี่ยน email ของผู้ส่งได้ที่บรรทัดนี้
gitlab_rails['gitlab_email_from'] = 'gitlab@example.com'
# หรือจะให้ตอบกลับมาที่ e-mail ไหนก็กำหนดได้ที่บรรทัดนี้
gitlab_rails['gitlab_email_reply_to'] = 'noreply@example.com'

# กำหนด path ที่เก็บ certificate ที่จะใช้ใน tls protocol
gitlab_rails['smtp_ca_file'] = '/path/to/your/cacert.pem'
และทำการ update configuration ด้วยคำสั่ง
gitlab-ctl reconfigure
ถ้าไม่มี SMTP server เราสามารถติดตั้ง postfix ลงในเครื่องนี้เลยก็ได้
ขั้นตอนที่ 4 login ด้วย intial root password
เราจะใช้ password ที่ได้ generate ขึ้นมาและถูกเก็บอยู่ที่ /etc/gitlab/initial_root_password
initial root password นั้นจะถูกเก็บแค่ไว้ 24 ชม. เท่านั้น
หลังจากนั้นทำการ login เข้าไปใน gitlab ด้วย user root และ password ที่ได้จากใน file initial_root_password หลังจากนั้นระบบจะบังคับให้เราตั้ง password สำหรับ root ใหม่ และเราก็จะได้ gitlab server ที่พร้อมให้บริการแล้ว
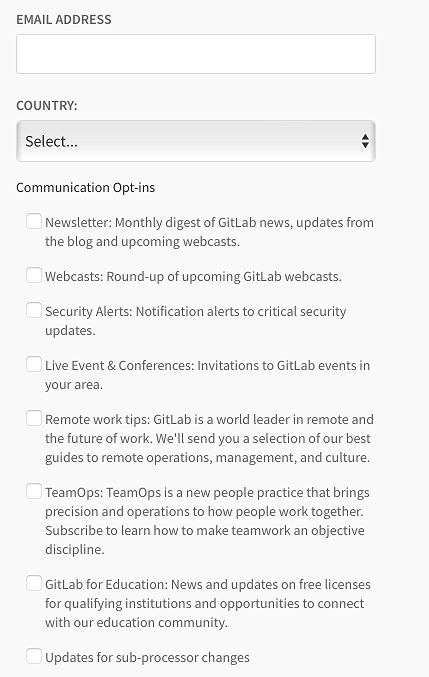
ขั้นตอนที่ 5 ทำการ config email subscription
ในขั้นตอนนี้ถือเป็น option เสริม เราสามารถไปลงทะเบียนกับ gitlab เพื่อขอรับข่าวสารต่างๆ รวมทั้งการแจ้งเตือนด้านความปลอดภัย ซึ่งเราสามารถเข้าไปที่ Communication Preference Center และกำหนดรายละเอียดต่างๆ ดังรูป
ติดตั้ง Gitlab ลงบน RedHat
ขั้นตอนที่ 1 เริ่มจากการติดตั้ง dependencies ต่างๆ
ในขั้นตอนนี้จะทำการติดตั้งสิ่งที่จำเป็นต้องมีในการใช้งาน Gitlab ซึ่งเราจะใช้คำสั่ง
# ทำการ update ubuntu กันก่อน
sudo apt-get update

# ติดตั้ง curl, openssh, ca-certificate, tzdata และ perl
sudo yum install -y curl policycoreutils openssh-server perl
policycoreutils เป็น package สำหรับเพิ่ม policy ใน SELinux
ขั้นตอนที่ 2 ติดตั้ง Gitlab
โดยขั้นตอนนี้เราจะทำการตรวจสอบ dependencies และ เพิ่ม repository เข้าไปใน source list ด้วยคำสั่งนี้
curl https://packages.gitlab.com/install/repositories/gitlab/gitlab-ce/script.deb.sh | sudo bash
สามารถเปลี่ยน url จาก gitlab-ce เป็น gitlab-ee ได้ถ้าต้องการทดลอง enterprise edition
หลังจากนั้นเราก็จะทำการติดตั้่ง gitlab ด้วยคำสั่ง
sudo yum install -y gitlab-ce
ขั้นตอนที่ 3 กำหนดต่า configuration
โดย deafault gitlab จะกำหนดค่า baseurl ไว้เป็น https://gitlab.example.com ดังนั้นถ้าเราต้องการจะเข้าถึง gitlab ผ่าน url แบบนี้สิ่งที่เราต้องมีคือ
- มี DNS ให้ทำการสร้าง A record ไว้เป็น domain สำหรับหรับการเข้าถึง gitlab
- มี certificate สำหรับการเข้าถึงผ่านทาง https
นอกจากนี้เรายังสามารถกำหนด configuration อื่นๆ ที่อยู่ในไฟล์ /etc/gitlab/gitlab.rb ยกตัวอย่างเช่นการ set smtp server สำหรับการส่ง notification ผ่านทาง email
ในตัวอย่างนี้เราจะใช้ gmail เป็น smtp server
# ตัวอย่างการ set gmail เป็น smtp server
gitlab_rails['smtp_enable'] = true
gitlab_rails['smtp_address'] = "smtp.gmail.com"
gitlab_rails['smtp_port'] = 587
gitlab_rails['smtp_user_name'] = "my.email@gmail.com"
gitlab_rails['smtp_password'] = "gmail-password"
gitlab_rails['smtp_domain'] = "smtp.gmail.com"
gitlab_rails['smtp_authentication'] = "login"
gitlab_rails['smtp_enable_starttls_auto'] = true
gitlab_rails['smtp_tls'] = false
gitlab_rails['smtp_openssl_verify_mode'] = 'peer'

#เราสามารถเปลี่ยน email ที่ส่งไปที่บรรทัดนี้
gitlab_rails['gitlab_email_from'] = 'gitlab@example.com'
# หรือจะให้ตอบกลับมาที่ e-mail ไหนก็กำหนดได้ที่บรรทัดนี้
gitlab_rails['gitlab_email_reply_to'] = 'noreply@example.com'
และทำการ update configuration ด้วยคำสั่ง
gitlab-ctl reconfigure
ขั้นตอนที่ 4 login ด้วย intial root password
เราจะใช้ password ที่ได้ generate ขึ้นมาและถูกเก็บอยู่ที่ /etc/gitlab/initial_root_password
initial root password นั้นจะถูกเก็บแค่ไว้ 24 ชม. เท่านั้น
หลังจากนั้นทำการ login เข้าไปใน gitlab ด้วย user root และ password ที่ได้จากใน file initial_root_password หลังจากนั้นระบบจะบังคับให้เราตั้ง password สำหรับ root ใหม่ และเราก็จะได้ gitlab server ที่พร้อมให้บริการแล้ว
ขั้นตอนที่ 5 ทำการ config email subscription
ในขั้นตอนนี้ถือเป็น option เสริม เราสามารถไปลงทะเบียนกับ gitlab เพื่อขอรับข่าวสารต่างๆ รวมทั้งการแจ้งเตือนด้านความปลอดภัย ซึ่งเราสามารถเข้าไปที่ Communication Preference Center และกำหนดรายละเอียดต่างๆ ดังรูป