รู้จักกับ git config
การนำ git ไปใช้ในชีวิตประจำวันเราจำเป็นต้องจัดการกับ configuration ของ git อยู่ตลอดเวลา ยกตัวอย่างเช่น เราต้องการจะเปลี่ยน git user เพราะเราไม่ได้ใช้ user เดียวกันตลอดเวลา หรือในบางกรณีเราอาจต้องการปิด error message บางตัว เราสามารถปรับเปลี่ยนการทำงานของ git ได้ผ่านทาง git config ในบทความนี้เราจะพาทุกท่านไปลองปรับเปลี่ยน config ต่างๆที่จะช่วยให้เราทำงานกับ git ได้ง่ายขึ้น

รูปแบบของ Git config
การกำหนด configuration ของ git นั้นจะอยู่ในรูปแบบของ toml ซึ่งจะแบ่ง configuration ออกเป็น section ต่างๆ ดังรูป
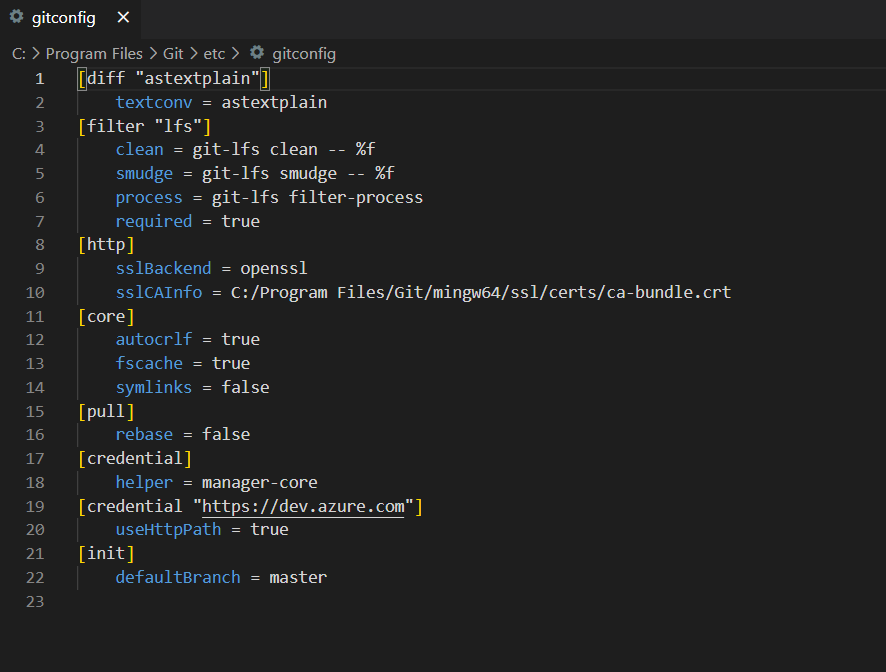
เวลาเราอ้างถึงค่าต่างๆใน configuration เราจะใช้ชื่อ section แล้วตามด้วย key ของ configuration ตัวนั้น เช่น core.autocrlf เป็นต้น
ส่วนใน section ที่มี subsection เช่น
[filter "lfs"]
    ...
    required = true
เราจะอ้างถึง subtitle ก่อนที่จะอ้างถึง key เช่นจากในตัวอย่างเราจะต้องอ้างถึง config ด้วย filter.lfs.required แบบนี้
# กำหนดค่า config ใน section filter ที่มี subsection เป็น lfs
git config filter.lfs.required true
เริ่มต้นรู้จักกับ Git config
อย่างแรกที่เราต้องรู้คือการจัดการ config นั้นมีหลาย scope โดยเราจะแบ่งออกเป็น 4 level ดังนี้
- System เป็น config ที่ใหญ่ที่สุดถ้าเราต้องการให้ทุกๆ repositories และทุกๆ users ใช้งาน configuration นี้ให้แก้ที่ system(ส่วนใหญ่เราไม่ได้แก้ที่ level นี้สักเท่าไหร่) git config ใน system จะเป็น option ต่างๆที่เราเลือกตอน setup
- Global เป็น config ที่เก็บอยู่ใน folder users นั่นคือ config ใน level นี้จะผูกติดกับ user ที่ login เข้ามาในเครื่อง
- Local เป็น config ที่มีผลเฉพาะใน repository นั้นๆ เพราะจะเก็บ configuration ไว้ใน folder .git ที่อยุ่ใน folder ที่เรากำลังทำงานด้วย
- Worktree ในแต่ละ repository เราสามารถสร้าง worktree ขึ้นมาได้(โดยปกติจะมี default แค่ worktree เดียว) ซึ่งในแต่ละ worktree จะผูกกับ branch เราเลยสามารถกำหนด config ตามแต่ละ worktree ได้เลย
Git config เก็บอยู่ที่ไหน?
บน Windows git config จะถูกเก็บอยู่ที่
| Scope | Location | filename | |
|---|---|---|---|
| system | C:\Program Files\Git\etc\gitconfig | gitconfig | |
| global | C:\Users\[Username ของคุณ]\.gitconfig | .gitconfig | |
| local | [Working Directory]\.git\config | config | |
| worktree | [Working Directory]\.git\config.worktree | config.worktree |
บน MacOS git config จะถูกเก็บอยู่ที่
| Scope | Location | filename | |
|---|---|---|---|
| system | /opt/homebrew/etc/gitconfig (ถ้า install ผ่านทาง Homebrew) หรือ /usr/local/etc/gitconfig | gitconfig | |
| global | /Users/[Username ของคุณ]/.gitconfig | .gitconfig | |
| local | [Working Directory]/.git/config | config | |
| worktree | [Working Directory]/.git/config.worktree | config.worktree |
บน Linux git config จะถูกเก็บอยู่ที่
| Scope | Location | filename | |
|---|---|---|---|
| system | /etc/gitconfig | gitconfig | |
| global | ~/.gitconfig หรือ ~/.config/git/config | .gitconfig หรือ config | |
| local | [Working Directory]/.git/config | config | |
| worktree | [Working Directory]/.git/config.worktree | config.worktree |
ใน local เราจะใช้ชื่อ เป็น config เฉยๆ แต่ใน global และ system เราจะใช้ชื่อ gitconfig
Git config แบบ portable
เราสามารถใช้ file config ที่เรากำหนดขึ้นมาเองทั้งชื่อและ path ที่จัดเก็บ
Git config command
เราจะใช้คำสั่งต่างๆเหล่านี้ในการดู git config ในแต่ละ level
# ดึง git config ออกมาดูทีละตัว
git config user.name

# ดึงค่า git config ทั้งหมดออกมาดู
git config --list

# ดึง git config ทั้งหมดพร้อมกับบอกว่า config นี้เก็บอยู่มี่ไฟล์ไหน
git config --list --show-origin

# ดึงเฉพาะ git config ใน global
git config --list --global

# ดึงเฉพาะ git config ใน system
git config --list --system

# ดึงเฉพาะ git config ใน local
git config --list --local

# เปิด default editor ขึ้นมาเพื่อปรับแก้ config
git config --global -e

# ลบค่า config นี้ออก
git config --global --unset user.name

# ลบค่า config นี้ออกทั้ง section
git config --global --remove-section user
Config หลายๆ Identity
การ config identity จะเป็นขั้นตอนแรกที่ git จะบอกให้เราทำหลังจากติดตั้งเพราะเมื่อเกิดปัญหาขึ้นบน server-side repository หรือ remote repository(เช่น code ทับกันหรือชนกัน) เราต้องหาว่า user ไหน commit เข้ามา โดยส่วนใหญ่เราจะ set ที่ global config ด้วยคำสั่งนี้
# ใส่ชื่อ user และ e-mail เข้าไปใน global config
git config --global user.name "Phanupong Permimol"
git config --global user.email phanupong@irobust.co.th
ในหลายๆ case เราต้องการ identity มากกว่า 1 identity เช่น เราต้องการ username เป็นชื่อจริงเราตอนทำงานกับ repository ใน office แต่เราอาจต้องการชื่อเล่นตอนที่เรา contribute เข้าไปใน open-source project หรืออาจเป็น project ส่วนตัวอื่นๆ ดังนั้นเราจะ override global config ด้วยคำสั่งนี้
# กำหนดชื่อ และ email ที่ใช้เฉพาะสำหรับ project นี้เท่านั้น
git config --local user.name "P Permpimol"
git config --local user.email personal-email@example.com
Common Configuration
ในหัวข้อนี้เราจะมาลองดูว่า git config ตัวไหนที่น่าสนใจบ้าง จะได้นำไปลอง set กันดู
กำหนด Default Editor
เริ่มจาก git config ตัวแรก เราจะลองมาเปลี่ยนจาก editor ที่เป็น default(บน windows จะเป็น notepad และบน linux หรือ mac จะเป็น vi) ให้กลายเป็น VS Code ก่อนอื่นคุณต้องติดตั้ง VS Code ไว้ในเครื่องก่อน คุณสามารถเลือก Editor อื่นๆก็ได้ไม่จำเป็นต้องเป็น VS Code
การเปลี่ยน default editor ให้ทำการกำหนดค่า config ด้วยคำสั่งนี้
# ต้องมี --wait เพื่อบอกให้ command รอจนกว่าเราจะปิด vs code แล้วค่อยไปต่อ
git config --global core.editor "code --new-window --wait"
ตรวจสอบผลลัพธ์โดยการเปิด global config ด้วย editor ที่เรา set ไว้ด้วยคำสั่งด้านบน
# เปิด global config ด้วย Editor ที่กำหนดไว้
git config --global -e
ใช้ Diff บน VS Code
จากเดิมที่เราต้องดู diff บน command เราสามารถใช้ความสามารถของ VS Code มาช่วยดูความแตกต่างของ file ตอนเราสั่ง git difftool ได้ โดยที่เราต้องแก้ไข config ตามนี้ แนะนำว่าให้เปิดไฟล์แก้ไขเองจะง่ายกว่า(ไม่ต้องใช้ git config)
- เปิด editor ขึ้นมาแก้ global config
git config --global -e
- แก้ไข config ตามนี้
[diff]
    tool = vscode-diff
[difftool "vscode-diff"]
    cmd = code --wait --diff $LOCAL $REMOTE
    prompt = false
- ทดสอบผลลัพธ์ด้วยคำสั่งนี้
# ทำการแก้ไขไฟล์ก่อนแล้วค่อยใช้คำสั่งนี้
git difftool
ใช้ Merge Viewer ใน VS Code
เราสามารถเปลี่ยมาใช้่ Merge Viewer ใน VS Code ได้ด้วย config ด้านล่างนี้ ตัวนี้แนะนำเลยมีประโยชน์มากจริงๆ
[merge]
	tool = vscode-merge
[mergetool]
	keepBackup = false
[mergetool "vscode-merge"]
	cmd = code --wait $MERGED
Once this is in place, we can create a merge conflict:
git checkout -b develop
echo "More content." >> README.md
git add .
git commit -m "Updating README.md"
git checkout master
echo "Other content." >> README.md
git add .
git commit -m "Adding other content"
git merge develop
git mergetool
We can accept one of the changes in VS Code, and then commit our merge:
git commit
ตั้งชื่อย่อให้กับ git command
เราสามารถสร้าง shortcut สำหรับคำสั่งที่เราใช้บ่อยๆได้ด้วย git config โดยที่เราจะใช้คำสั่ง
# ใช้ st แทนที่คำว่า status
git config --global alias.st status

#เวลาเรียกใช้ก็จะสั้นๆแบบนี้
git st
นอกจากนี้เรายังสามารถเรียก git st ซำ้ต่อไปได้อีกด้วย
# จาก git status ย่อเป็น st ด้วยคำสั่งด้านบน
# เพิ่ม parameter --short เข้าไปแล้วย่อเป็น ss
git config --global alias.ss 'st --short'

# เราสามารถใช้ git ss แทนที่ git status --short
git ss
เราสามารถแก้ลงไปใน configuration file ได้เลย แบบนี้
[alias]
	st = status
	ss = st --short
	egc = config --global -e
	elc = config --local -e
	esc = config --system -e
	co = checkout
	br = branch
	ci = commit
	amend = co -a --amend
ไม่ควรใช้ alias ถ้ายังจำคำสั่งไม่ได้ เพราะจำทำให้ยิ่งสับสนและแก้ปัญหายากขึ้นไปอีก
อ่านต่อเพิ่มเติมได้ที่นี่