Docker คือชุดของเครื่องมือที่ช่วยให้เราทำงานกับ container ได้ง่ายขึ้นเหมือนกับ VMWare หรือ Virtual Box ที่ช่วยให้เราทำงานกับ VM ซึ่ง Docker จะประกอบไปด้วยส่วนประกอบหลักๆ ดังนี้
- Dockerd หรือ Docker daemon ทำหน้าที่สร้าง, ลบ, start หรือ stop container
- Docker cli เป็น command line ที่เราสั่ง docker build, docker run และอื่นๆอีกมากมาย โดยที่ docker cli จะส่งคำสั่งไปยัง dockerd อีกทีนึง
- Docker Desktop เป็น Application ที่นำไปติดตั้งลงใน Windows หรือ MacOS เพื่อจัดการกับ Virtual Machine ที่นำมาใช้ run docker ปัจจุบันบน MacOS เราจะใช้ HyperKit ส่วนบน Windows จะเป็น Windows Sub Linux(WSL)
- Docker Hub เป็น Container Registry ที่รวบรวม image ต่างๆในแต่ละ version(ใน docker เราจะใช้ tag ในการแยก version) เวลาเราอยากได้เครื่องมืออะไรก็เข้าไปค้นหาใน Docker Hub ได้เลย
Container คือการแบ่งแยก Environment คล้ายๆกับ Virtual Machine แต่จะเป็นการแบ่งแยก Environment ด้วย OS แต่เราสามารถสร้าง Container ในระดับ OS ได้แต่ Linux และ Windows Server เท่านั้น ส่วน Windows แบบใช้งานส่วนตัวทั่วไปและ MacOS ต้องใช้การจำลอง Linux ขึ้นมาด้วย HyperKit, HyperV และ Windows Sub Linux(WSL)

Container vs Docker
Docker เป็น Container runtime ซึ่งจะมี docker cli เป็นเครื่องมือที่ช่วยจัดการ container ทั้งการ pull image, สร้าง container, start/stop container และอื่นๆอีกมากมาย ซึ่งการทำงานกับ container นั้นสามารถเลือกได้หลายยี่ห้อ เช่น containerd(นิยมใช้กันมากบน server) และ Cri-o ดังนั้น docker ไม่เท่ากับ container
Container vs Virtual Machine(VM)
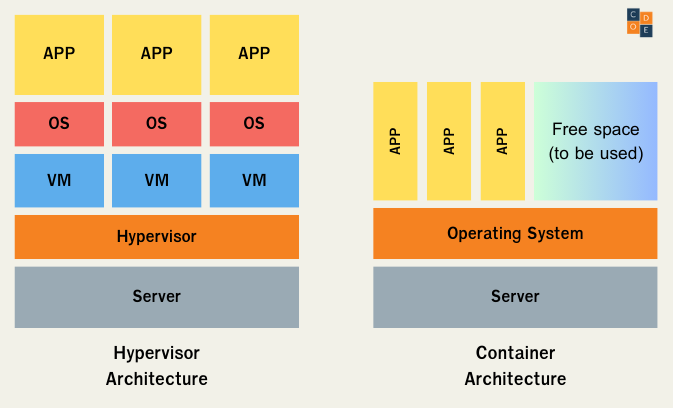
Container นั้นต่างจาก Virtual Machine(VM) ตรงที่การทำงานกับ Container นั้นจะใช้ความสามารถของ Operating System ซึ่งต่างจาก VM ที่ใช้ความสามารถของ Application ดังนั้น VM จึงต้องสร้าง Guest OS ขึ้นมา จึงทำให้ VM ทำงานช้ากว่าและกิน resource มากกว่า container ดังรูป
ข้อดีของ Docker และ Container
จริงๆแล้วในหัวข้อนี้จะเป็นข้อดีของ Container แต่เนื่องจากเราใช้งาน Container ผ่านทาง Docker ดังนั้นเราก็ให้ credit เค้าซักหน่อย
- เราสามารถจำลอง Environment ได้อย่างรวดเร็ว แค่ pull image ลงมาก็ใช้ได้เลย
- สามารถทดลอง framework มากกว่า 1 version ได้เพราะต่างคนต่างอยู่ใน container ของตัวเอง
- สามารถเปลี่ยน version ใหม่ได้ง่าย
- สามารถใช้งาน Command Line ต่างๆได้โดยที่ไม่ต้องติดตั้ง
- สามารถนำไป deploy ลงบน Server ได้ง่าย ทั้งบน On-Prem และ On-Cloud
- สามารถ limit การใช้งาน CPU และ Memory ได้
- สามารถทำ Logging และ Monitoring ได้ง่าย
Container Image
การทำงานของ Container นั้นจะต่างจาก VM ตรงที่เราจะต้องมี Container Image ก่อนถึงจะสร้าง Container ได้ซึ่งการได้มาซึ่ง Container Image นั้นมีได้ 2 วิธีคือ
-
เอา Image ของคนอื่นเค้ามาใช้ วิธีการนี้เราสามารถ pull image ลงมาจาก container registry ได้เลย ซึ่ง container registry ที่ได้รับตวามนิยมมากที่สุดคือ https://hub.docker.com เวลาใช้งานเราสามารถ run สั่ง docker pull เพื่อ download image ลงมาจาก docker hub
$ docker pull helloworldและสั่ง docker run เพื่อสร้าง container
$ docker run hello-worldและจะได้ผลลัพธ์ ดังนี้
Hello from Docker!
This message shows that your installation appears to be working correctly.

To generate this message, Docker took the following steps:
1. The Docker client contacted the Docker daemon.
2. The Docker daemon pulled the "hello-world" image from the Docker Hub.
3. The Docker daemon created a new container from that image which runs the executable that produces the output you are currently reading.
4. The Docker daemon streamed that output to the Docker client, which sent it to your terminal.

To try something more ambitious, you can run an Ubuntu container with:
$ docker run -it ubuntu bash

Share images, automate workflows, and more with a free Docker ID:
https://hub.docker.com/

For more examples and ideas, visit:
https://docs.docker.com/get-started/
ขั้นตอนการทำงานของ Docker จะมีลำดับตามนี้
- Docker client ติดต่อกับ Docker daemon
- Docker daemon ทำการ pull image ชื่อว่า “hello-world” จาก Docker Hub
- Docker daemon สร้าง container จาก image ที่ได้ pull ลงมา
- Docker daemon ทำการ stream output ไปยัง Docker client เพื่อให้เราเห็นใน terminal
-
สร้าง Image ขึ้นมาเอง ซึ่งเราต้องสร้าง Dockerfile ขึ้นมา โดยที่เราจะระบุ Base Image แบบนี้
FROM alpine:3.18.4
CMD ["echo", "Hello Docker!"]
หลังจากนั้นเราก็จะทำการ Build Image ขึ้นมาจาก Dockerfile ที่เราได้สร้างขึ้น ซึ่งคำสั่งนี้เราต้อง run ใน path ที่มี Dockerfile อยู่
$ docker build -t hello .หลังจากนั้นนำ Image ที่เราได้จากคำสั่ง docker build มาสร้างเป็น container ด้วยคำสั่ง docker run
$ docker run --rm helloผลลัพธ์ที่ได้จากคำสั่ง docker run จะเป็นแบบนี้
Hello Docker!
เครื่องมือที่ใช้ในการจัดการ Docker Container
ในการทำงานกับ container นั้นมีเครื่องมือที่เป็น Opensource ให้เลือกใช้อยู่มากมาย แต่เครื่องมือที่คุณต้องรู้จักและต้องนำไปใช้แน่ๆ คือ
- Docker Compose ถ้าเราต้องการให้ container มากกว่า 1 ตัวมาทำงานร่วมกันเราจะใช้ docker compose ในการสร้าง network ของ container เช่น container ที่ทำหน้าที่เป็น Web API และ container ที่ทำหน้าที่เป็น database มาทำงานร่วมกัน เราจะประกาศ services ไว้ในไฟล์ docker-compose.yml หลังจากนั้นเราสามารถ start containers ทั้ง 2 ตัวนี้่ด้วยคำสั่ง
$ docker-compose up -d
และถ้าเราต้องการให้หยุดการทำงานพร้อมกับลบ containers ทั้ง 2 ตัวนี้ออก เราจะใช้คำสั่ง
$ docker-compose down
- Portainer เป็นเครื่องมือที่ใช้ในการจัดการ container ผ่านทาง GUI เหมาะสำหรับผู้ใช้งานที่ไม่ค่อยถูกกับ command line และนอกจากจะใช้งานง่ายขึ้นแล้ว portainer ยังสามารถ deploy container ข้าม platform ได้อย่างง่ายดาย

ลองดูการทำงานอื่นๆของ Docker ได้ที่บทความต่อไปนี้

