End-To-End Testing ด้วย Playwright
Playwright คือ automated end-to-end testing framework ที่พัฒนาโดย Microsoft ซึ่ง Playwright ถือว่าเป็นเครื่องมือที่เข้ามาแก้ปัญหาและปิดข้อจำกัดของทั้ง Selenium และ Cypress
ทำไมต้องเป็น Playwright
Playwright ต่างจาก Selenium และ Cypress ตรงที่
- รองรับหลายภาษา สามารถเขียน test script ด้วย JavaScript, TypeScript, Python, Java และ Dotnet
- ไม่ต้องติดตั้ง Webdriver(ซึ่งมีปัญหาเรื่องการ update มาก) Playwright สามารถใช้ได้กับ browser หลักๆอย่าง Chromium, Chrome, Firefox, Webkit และ Edge
- ใช้การสร้าง BrowserContext(isolated context) ขึ้นมาทำให้เร็วกว่าการเปิด browser แบบปกติ แถมยังสามารถ run แบบ parallel ได้อีกด้วย
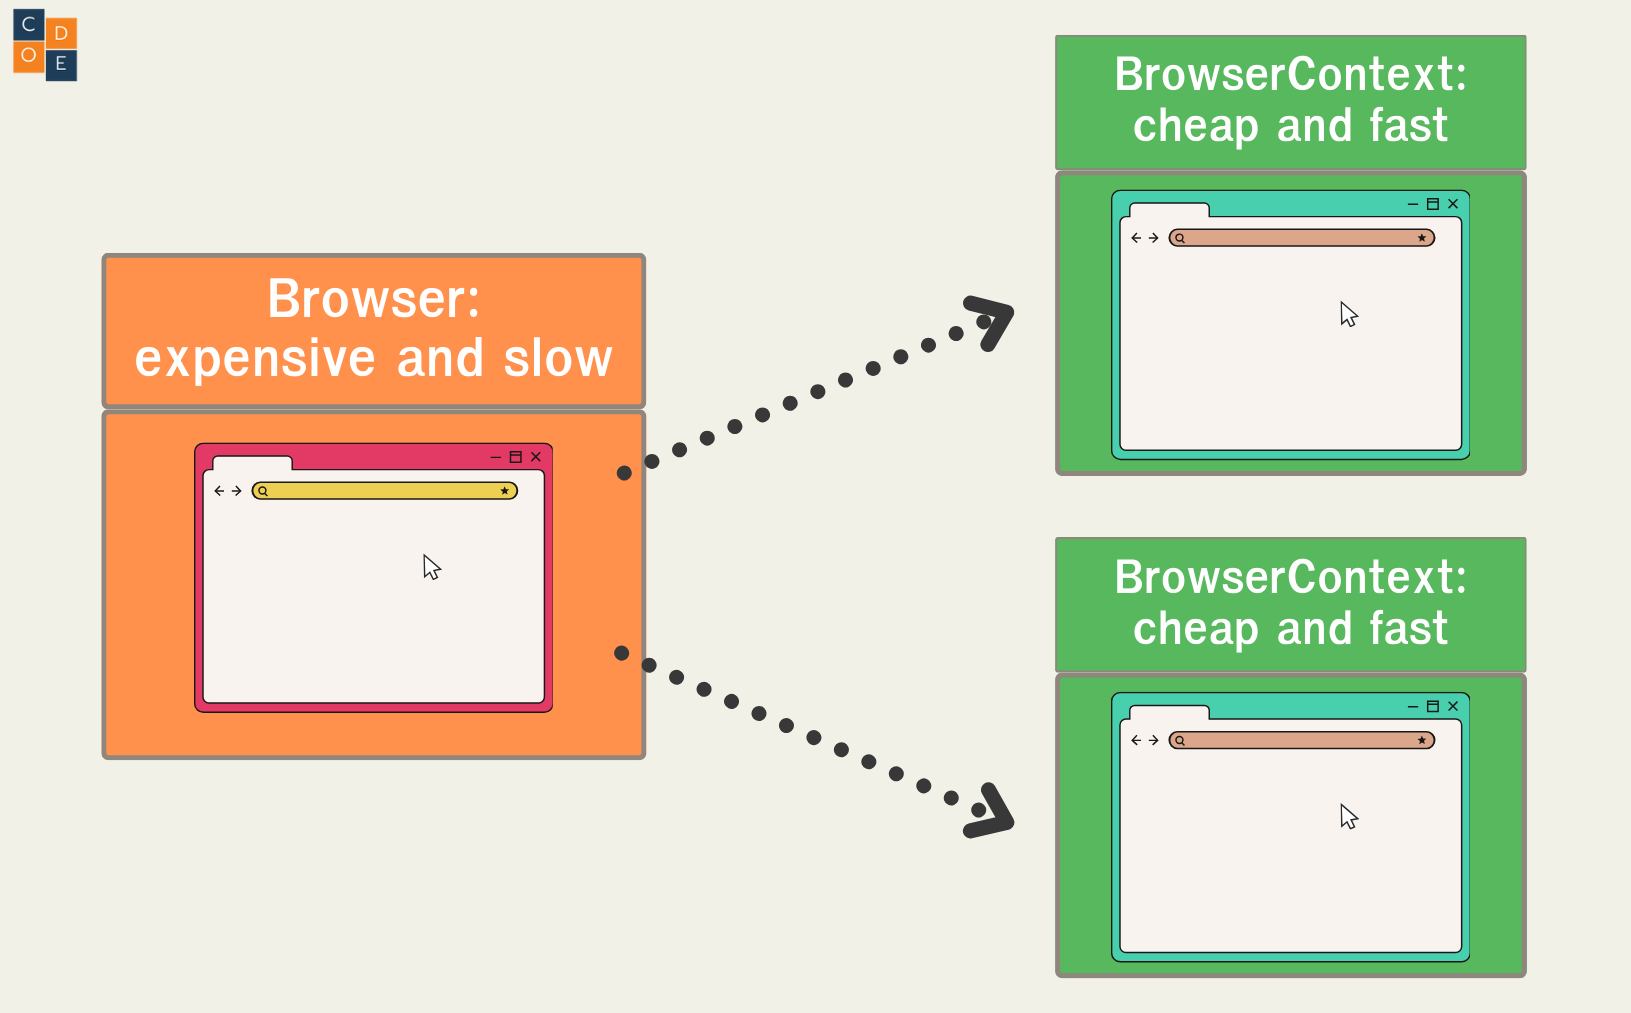
Playwright จะสร้าง browserContext ขึ้นมาเพื่อให้ทำงานแบบ parallel ได้ - สามารถใช้งานได้ทุก platform ทั้ง Windows, Linux และ MacOS(ข้อนี้จะเหมือนกับ Selenium และ Cypress)
- ไม่ต้องใช้ Wait Until Element ตลอดเวลาอีกต่อไป เพราะ Playwright จะรอจนกว่า Element นั้นจะแสดงผลขึ้นมาเอง
- การติดตั้งทำได้ง่ายกว่า Selenium แต่จะพอๆกับ Cypress
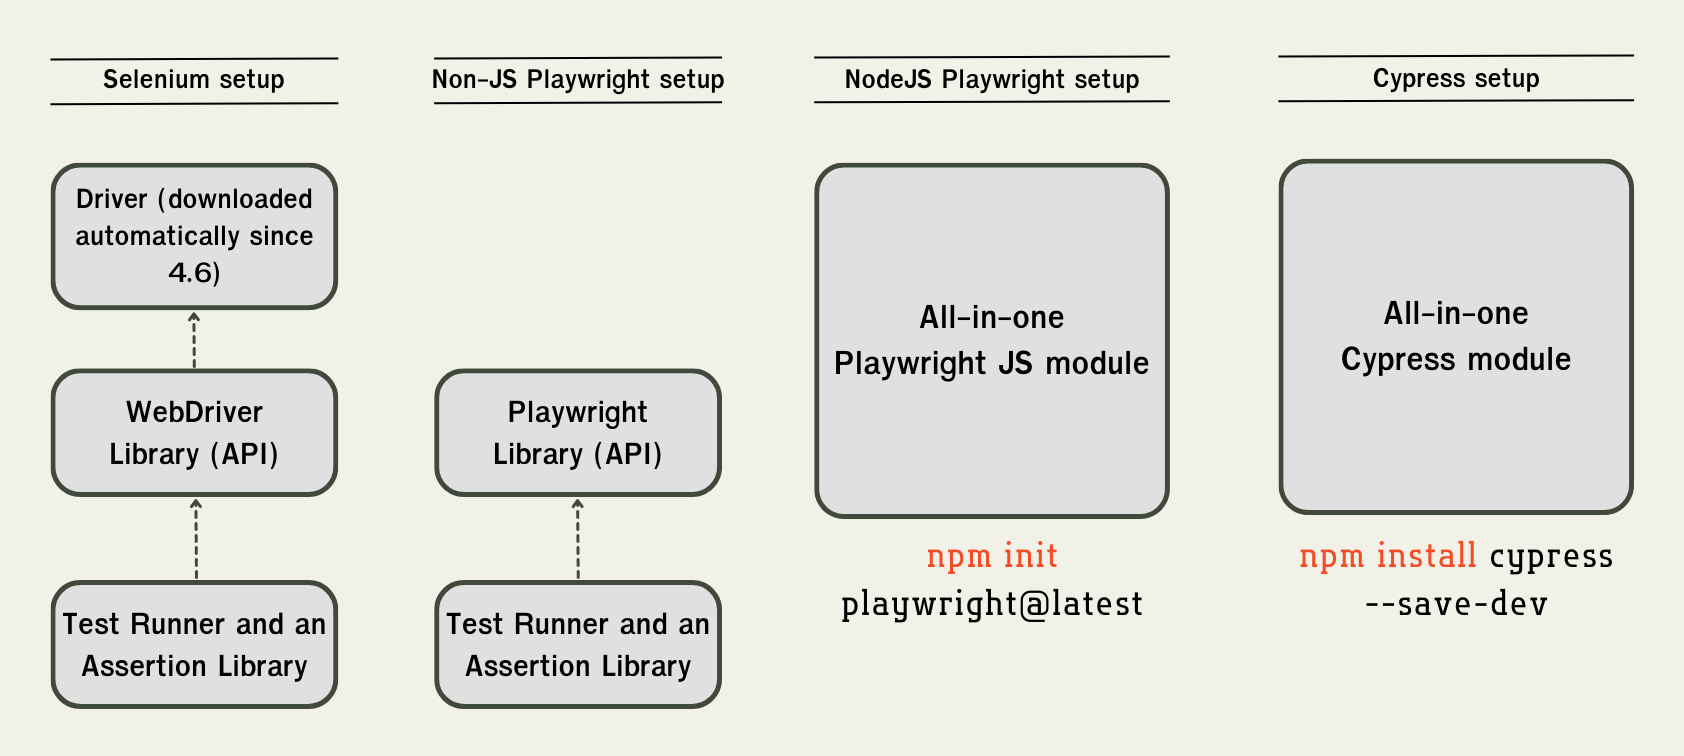
ถ้าเราเขียน Playwright Code ด้วย JavaScript จะเริ่มต้นได้ง่ายมาก เพราะ playwright module จะมี Test runner มาให้อยู่แล้ว แต่ถ้าใช้ภาษาอื่นๆคุณต้องติดตั้ง Test runner เพิ่มอีก 1 ตัว
Playwright vs Cypress
ถ้าจะเปรียบเทียบ Automated Testing tools ที่เป็นทางเลือกสำหรับ tester รุ่นใหม่ก็จะเป็น Playwright(ออกมาในปี 2020) และ Cypress(ออกมาในปี 2017) แต่เนื่องจาก 2 ตัวนี้มีโครงสร้างของ Architecture ที่แตกต่างกัน ทำให้มีการทำงานที่แตกต่างกัน ซึ่งข้อแตกต่างของ Playwright และ Cypress มีดังนี้
- Playwright เปิดพร้อมกันหลายๆ browser ได้ โดยที่ User ไม่ชนกันเนื่องจากมี BrowserContext(ทำงานแบบ Asynchronous)
- Playwright สามารถเปิด Tab ใหม่ได้ ในขณะที่ Cypress ทำไม่ได้
- Playwright สามารถ Login ด้วย Authenticator อื่นๆได้ แต่ Cypress จะทดสอบแค่ใน domain เดียวกันข้าม domain ไม่ได้
ติดตั้ง Playwright
เข้าสู่ขั้นตอนการติดตั้ง อย่างที่เห็นในรูปด้านบนการติดตั้งจะแบ่งออกเป็น 2 ส่วนด้วยกันคือ
1. เขียน Test Script ด้วย JavaScript หรือ Typescript
ถ้าเราต้องการเขียน Test Script ด้วย JavaScript สิ่งที่เราต้องติดตั้งมีเพียงแค่ playwright module เท่านั้น เพราะในนั้นจะมี Test Runner มาให้อยู่แล้ว
$ npm init playwright@latest
หลังจาก run คำสั่ง npm init แล้วเราจะต้องเลือก packages ต่างๆที่จะติดต้ังลงไปโดยที่ต้องตอบคำถามต่างๆ ดังนี้
Need to install the following packages:
create-playwright@1.17.131
Ok to proceed? (y)

Getting started with writing end-to-end tests with Playwright:
Initializing project in '.'
✔ Do you want to use TypeScript or JavaScript? · TypeScript
✔ Where to put your end-to-end tests? · tests
✔ Add a GitHub Actions workflow? (y/N) · false
✔ Install Playwright browsers (can be done manually via 'npx playwright install')? (Y/n) · true
- เลือกใช้ภาษาอะไร? ระหว่าง Typescript และ JavaScript
- End-To-End Tests อยู่ใน folder ไหน?
- จะให้เพิ่ม Github Action Workflow สำหรับทำ CI มั้ย?
- จะให้ติดตั้ง Playwright browsers ด้วยรึเปล่า?
หลังจากนั้นเราเข้าไปใน folder tests จะมีตัวอย่าง test script มาให้
|
|
ในตัวอย่างนี้จะเป็นการทดสอบใน 2 กรณีคือ
- เข้าไปที่ https://playwright.dev/ และดูว่า Title ของ page ต้องมีคำว่า Playwright
- กดปุ่ม Get started แล้วหลังจากนั้นจะมี tag H1 ที่มีคำว่า Installation
เริ่มทำการทดสอบ
หลังจากที่เราเขียน Test Script ของเราเสร็จเรียบร้อยแล้ว ถึงเวลาที่เราจะนำ Test Script ไป run ด้วยคำสั่ง
$ npx playwright test
ผลลัพธ์ที่ได้จะออกมาเป็น 6 tests โดยใช้ 4 workers
Running 6 tests using 4 workers
  6 passed (13.5s)
Playwright จะกำหนดจำนวน Workers ไว้เป็น 50% ของจำนวน CPU Cores ดังนั้นถ้ามี 8 cores เราจะได้ 4 workers เป็นค่าสูงสุดแต่ถ้าเราต้องการกำหนดจำนวน workers สามารถใส่จำนวน workers เข้าไปตอน run test ได้
$ npx playwright test --workers 4
และที่ออกมาเป็น 6 cases เนื่องจากในไฟล์ playwright.config.ts กำหนด projects(browsers และขนาดของหน้าจอ) ไว้ 3 projects
projects: [
    {
      name: 'chromium',
      use: { ...devices['Desktop Chrome'] },
    },
    {
      name: 'firefox',
      use: { ...devices['Desktop Firefox'] },
    },
    {
      name: 'webkit',
      use: { ...devices['Desktop Safari'] },
    }
]
เราสามารถเลือกทดสอบเฉพาะ project ที่ต้องการด้วยคำสั่ง
$ npx playwright test --project=chromium
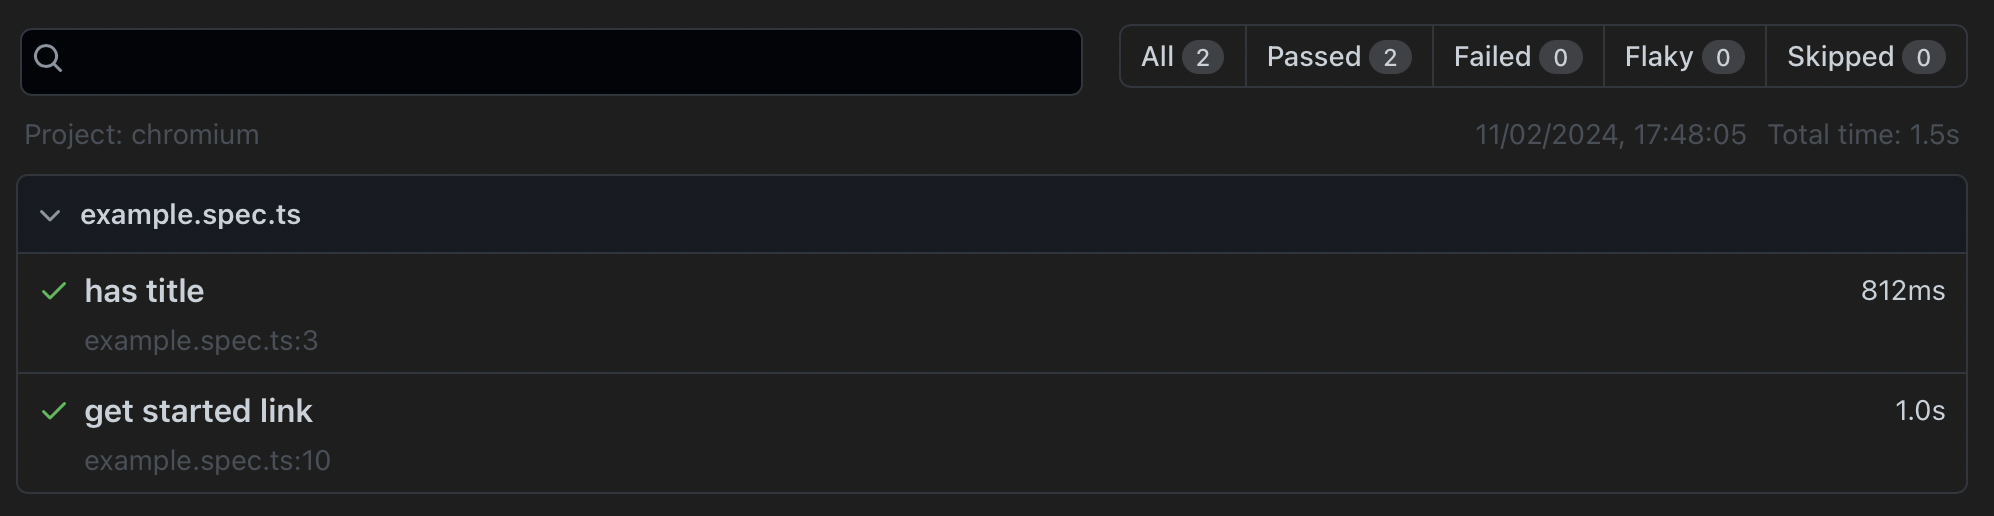
ผลลัพธ์จะออกมาเหลือแค่ 2 cases เพราะ run เฉพาะบน Chromium เท่านั้น
Running 2 tests using 2 workers
  2 passed (1.5s)
หลังจากนั้นเปิดดู report ด้วยคำสั่ง
$ npx playwright show-report
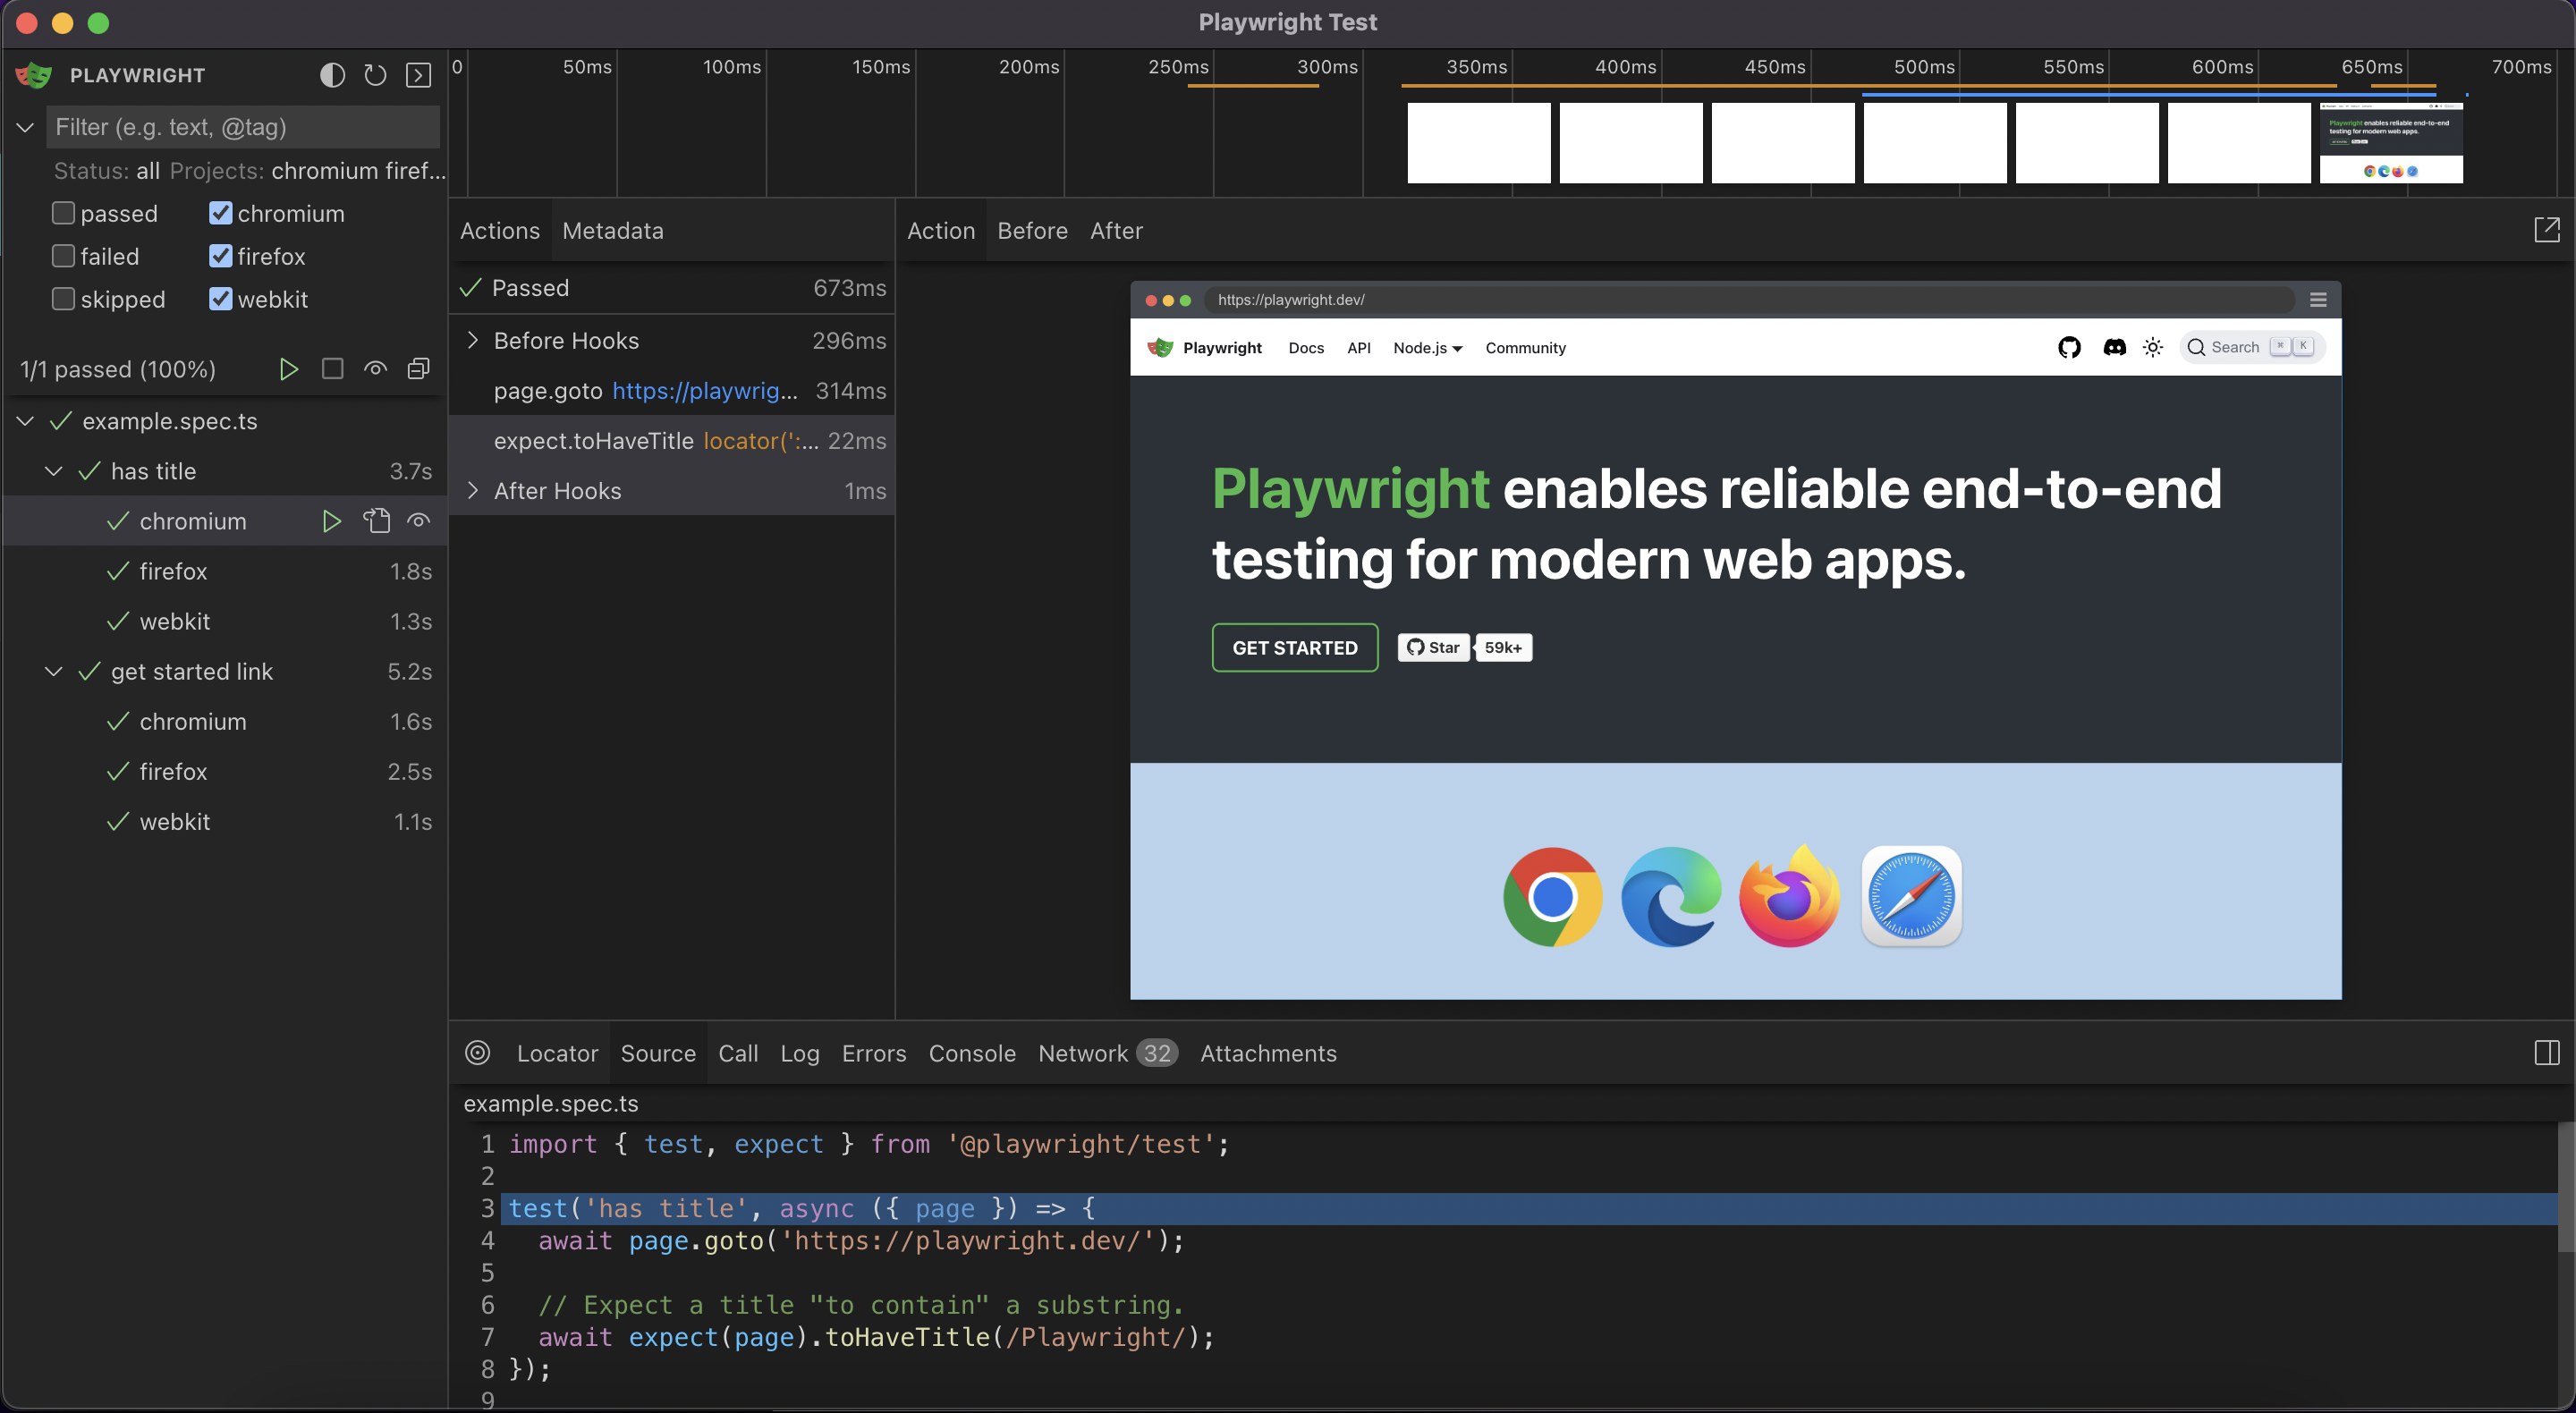
Debuging ด้วย Playwright UI
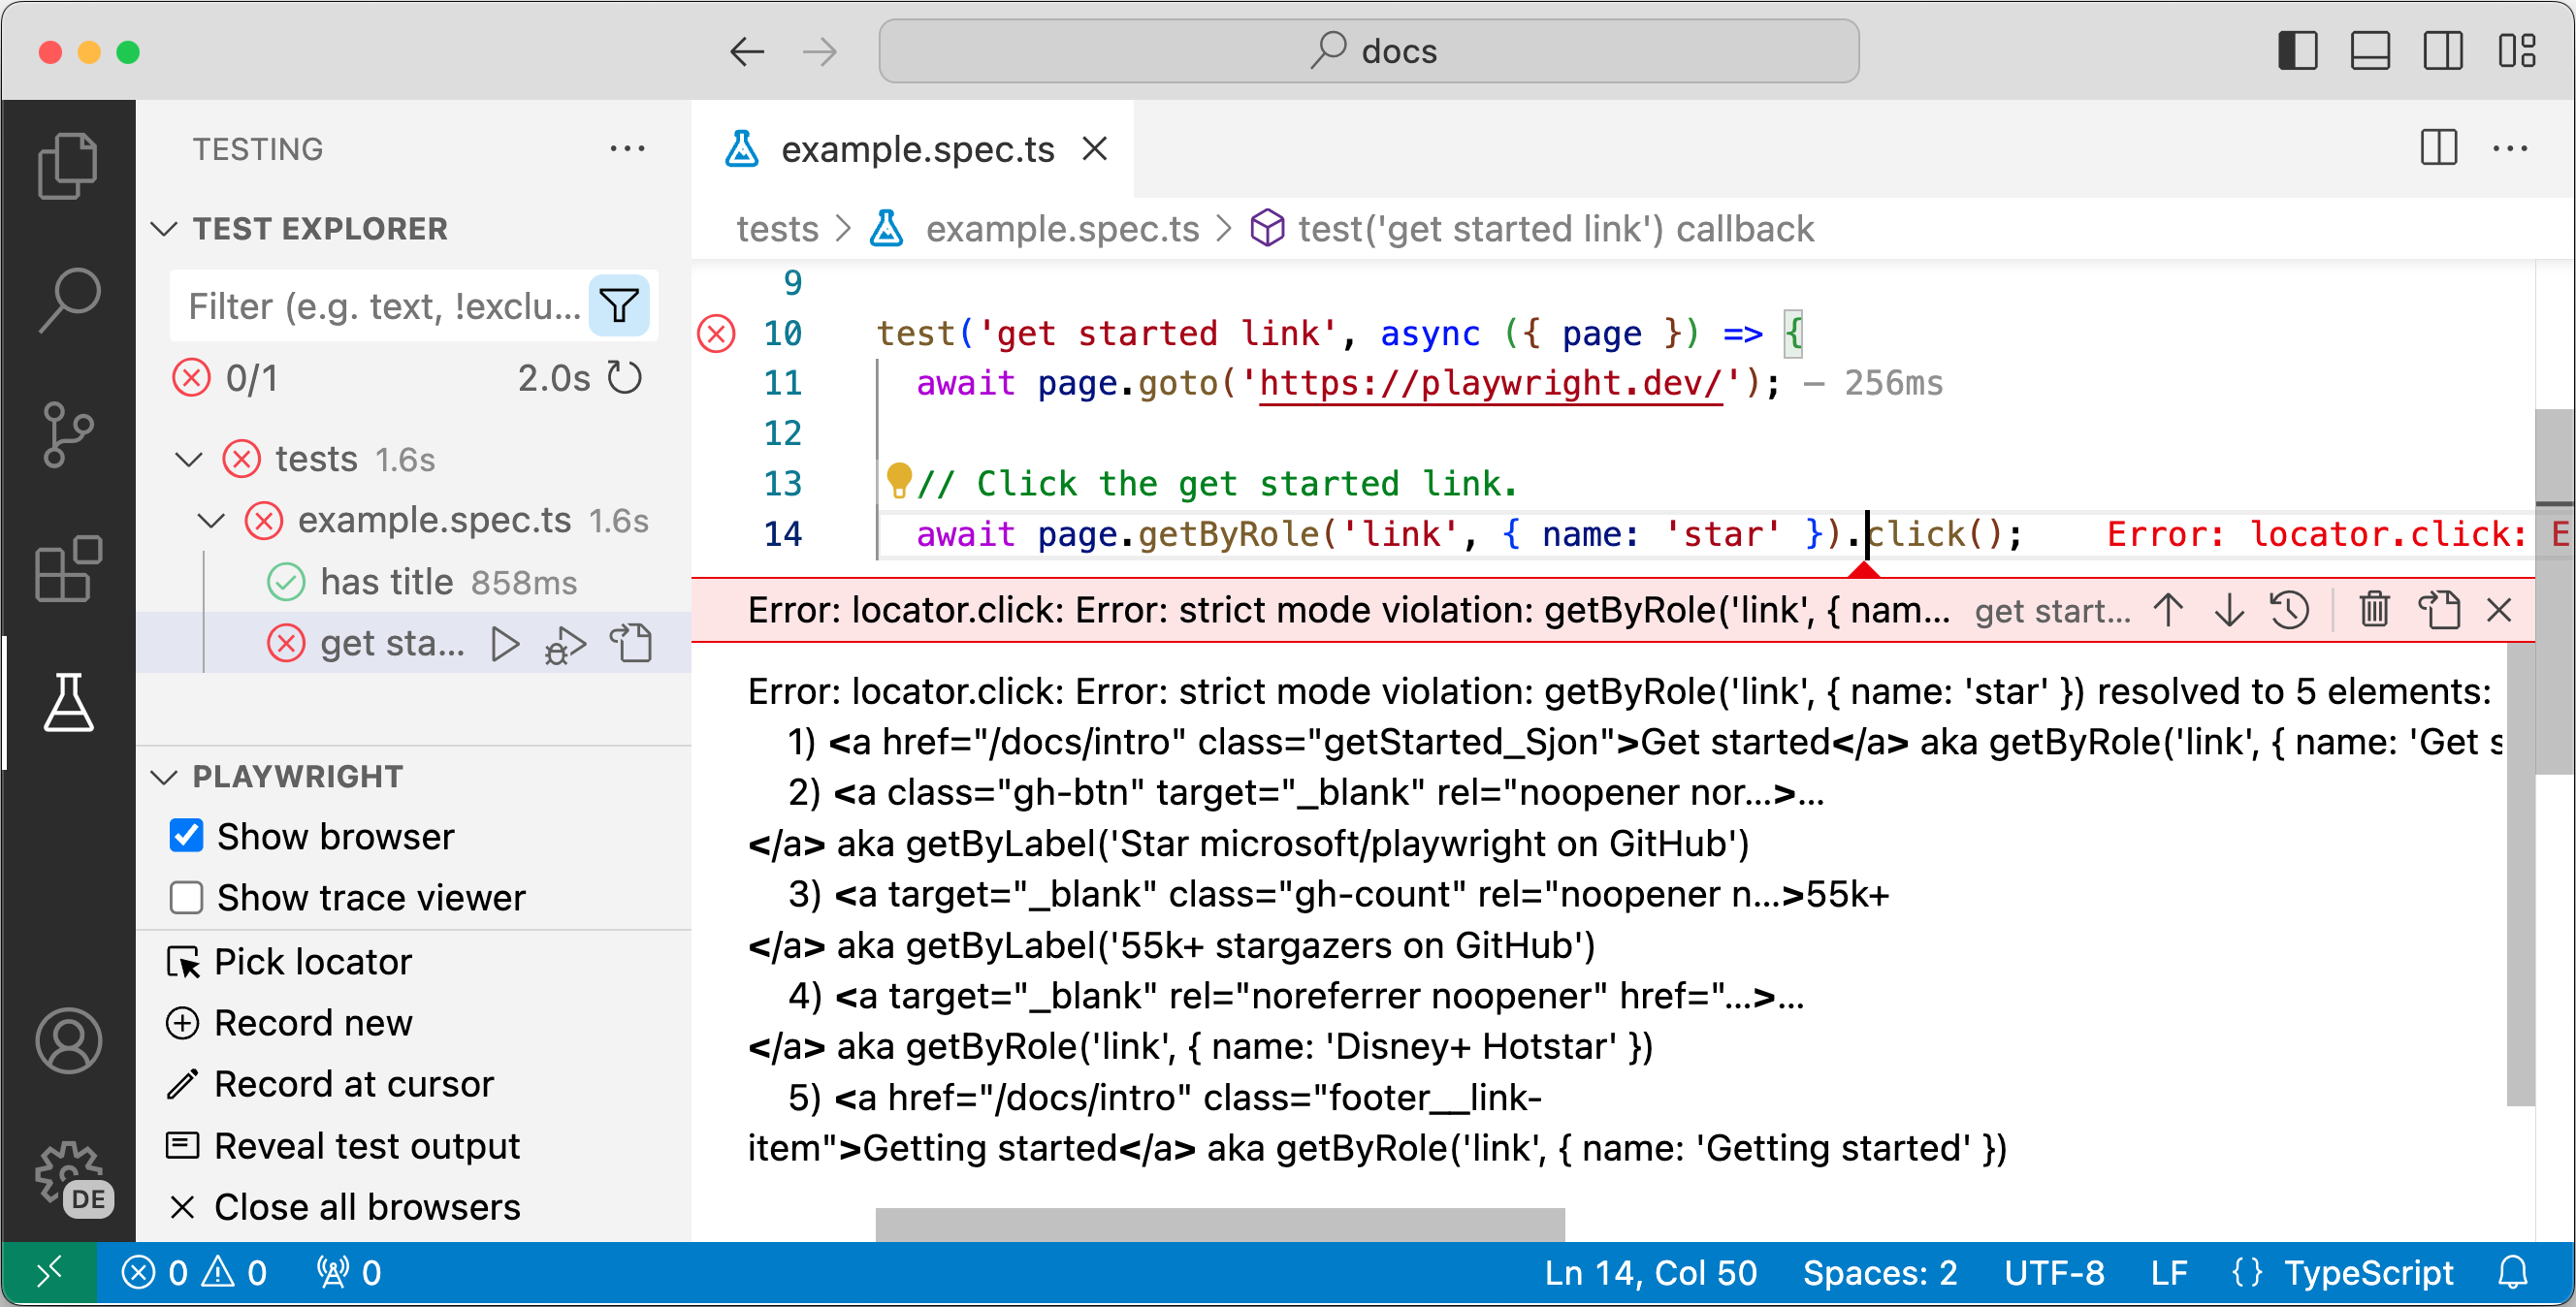
ถ้าระหว่างที่เราทำการทดสอบเกิด test fail ขึ้นมาซึ่งอาจเกิดจากปัญหาด้าน network หรือ javascript error ระหว่างทางเราสามารถเข้าไปดูการทำงานผ่านทาง UI ได้ด้วยคำสั่ง
$ npx playwright test --ui
เราจะได้ UI ที่คล้ายๆกับ Chrome Development Tools ดังรูป
2. เขียน Test Script ด้วยภาษาอื่นๆ
นอกจาก Javascript และ Typescript แล้ว Playwright ยัง support ภาษาอื่นๆอีก เช่น Python, Java และ Dotnet
การติดตั้งของภาษาอื่นๆจะแตกต่างจาก JavaScript และ Typescript ตรงที่เราต้องติดตั้ง Test runner เพิ่ม
- ถ้าใช้ python เราต้องใช้ pytest เป็น Test runner
- ถ้าใช้ Java เราต้องใช้ Maven เป็น Test runner
- ถ้าใช้ Dotnet เราต้องใช้ NUnit หรือ MSTest เป็น Test runner
Playwright Locators
Locators คือวิธีการค้นหา Elements ใน UI ที่เราต้องการทดสอบ ถือว่าเป็นหนึ่งในองค์ประกอบหลักของการใช้งาน automated test เพราะถ้า Locators ใช้งานง่าย แก้ไขง่าย ก็จะทำให้ปัญหาในการทำงานน้อยลง ซึ่งใน Playwright จะมี Locators ดังนี้
Locator by Label
เราจะใช้ method getByLabel สำหรับดึงเอา input ที่อยู่ถัดจาก Label นี้ เช่น HTML เป็น Form หน้าตาแบบนี้
<div>
    <label for="firstname">First name</label>
    <input type="text" id=firstname />
</div>
เราจะใช้ Locator แบบนี้
const firstname = page.getByLabel('First name');
Locator by Role
เราสามารถใช้ role ในการค้นหา Element ได้ เช่นต้องการค้นหาปุ่ม เราจะ method getByRole เพื่อค้นหาปุ่มก่อน หลังจากนั้นค่อยระบุ attribute ของปุ่มลงไป เช่น ชื่อว่า register
const btnRegister = page.getByRole('button', { name: 'register'});
register เป็น Case-in sensitive นั่นคือจะเป็นตัวใหญ่หรือเล็กก็ได้
ซึ่งการเลือก role เราสามารถเลือกได้หลายแบบมากๆ ให้กด Ctrl + Click ที่ method getByRole เราจะพบว่ามี role ให้เราเลือกมากมาย เช่น alert, checkbox, heading, link,img และอื่นๆ
Locator by Text
เราสามารถใช้ข้อความในการระบุตำแหน่งของ Element ที่ต้องการได้ เช่น เราต้องการคำว่า Start Playwright Now เราจะใช้ method getByText แบบนี้
const txt = page.getByText('Start Playwright Now')
Generic Locator
คือ Locator ที่เหมือนกับ Automated Testing Tool อื่นๆคือเราจะใช้ CSS และ Xpath ในการค้นหา Element
Locator by Class
ถ้าเราต้องการค้นหาปุ่ม Search ที่มี CSS class เป็น order-search เราจะใช้คำสั่ง
const btnSearch = page.locator('.order-search')
Locator by XPath
หรือถ้าเราต้องการ Locator ด้วย XPath เราจะเขียนแบบนี้
const btnSearch = page.locator('xpath=////*[@id="navbar"]/a[4]/img')
ซึ่งปกติเราจะไม่ได้เขียน XPath เองแต่เข้าไปที่ Inspect Elements แล้วคลิกขวาที่ Element ที่ต้องการ หลังจากนั้นเลือก Copy > Copy XPath
หรือถ้าต้องการตัวช่วยในการระบุ Locator เราสามารถใช้ Playwright Codegen มาช่วยระบุ Locator ให้เราได้
Playwright Codegen
นอกจากการเขียน script ขึ้นมาเองแล้วเรายังสามารถ ใช้่ Playwright Codegen สำหรับการ Generate Test script ออกมาให้เรา โดยที่ใช้คำสั่ง playwright codegen และระบุ URL เข้าไปแบบนี้
$ npx playwright codegen demo.playwright.dev/todomvc
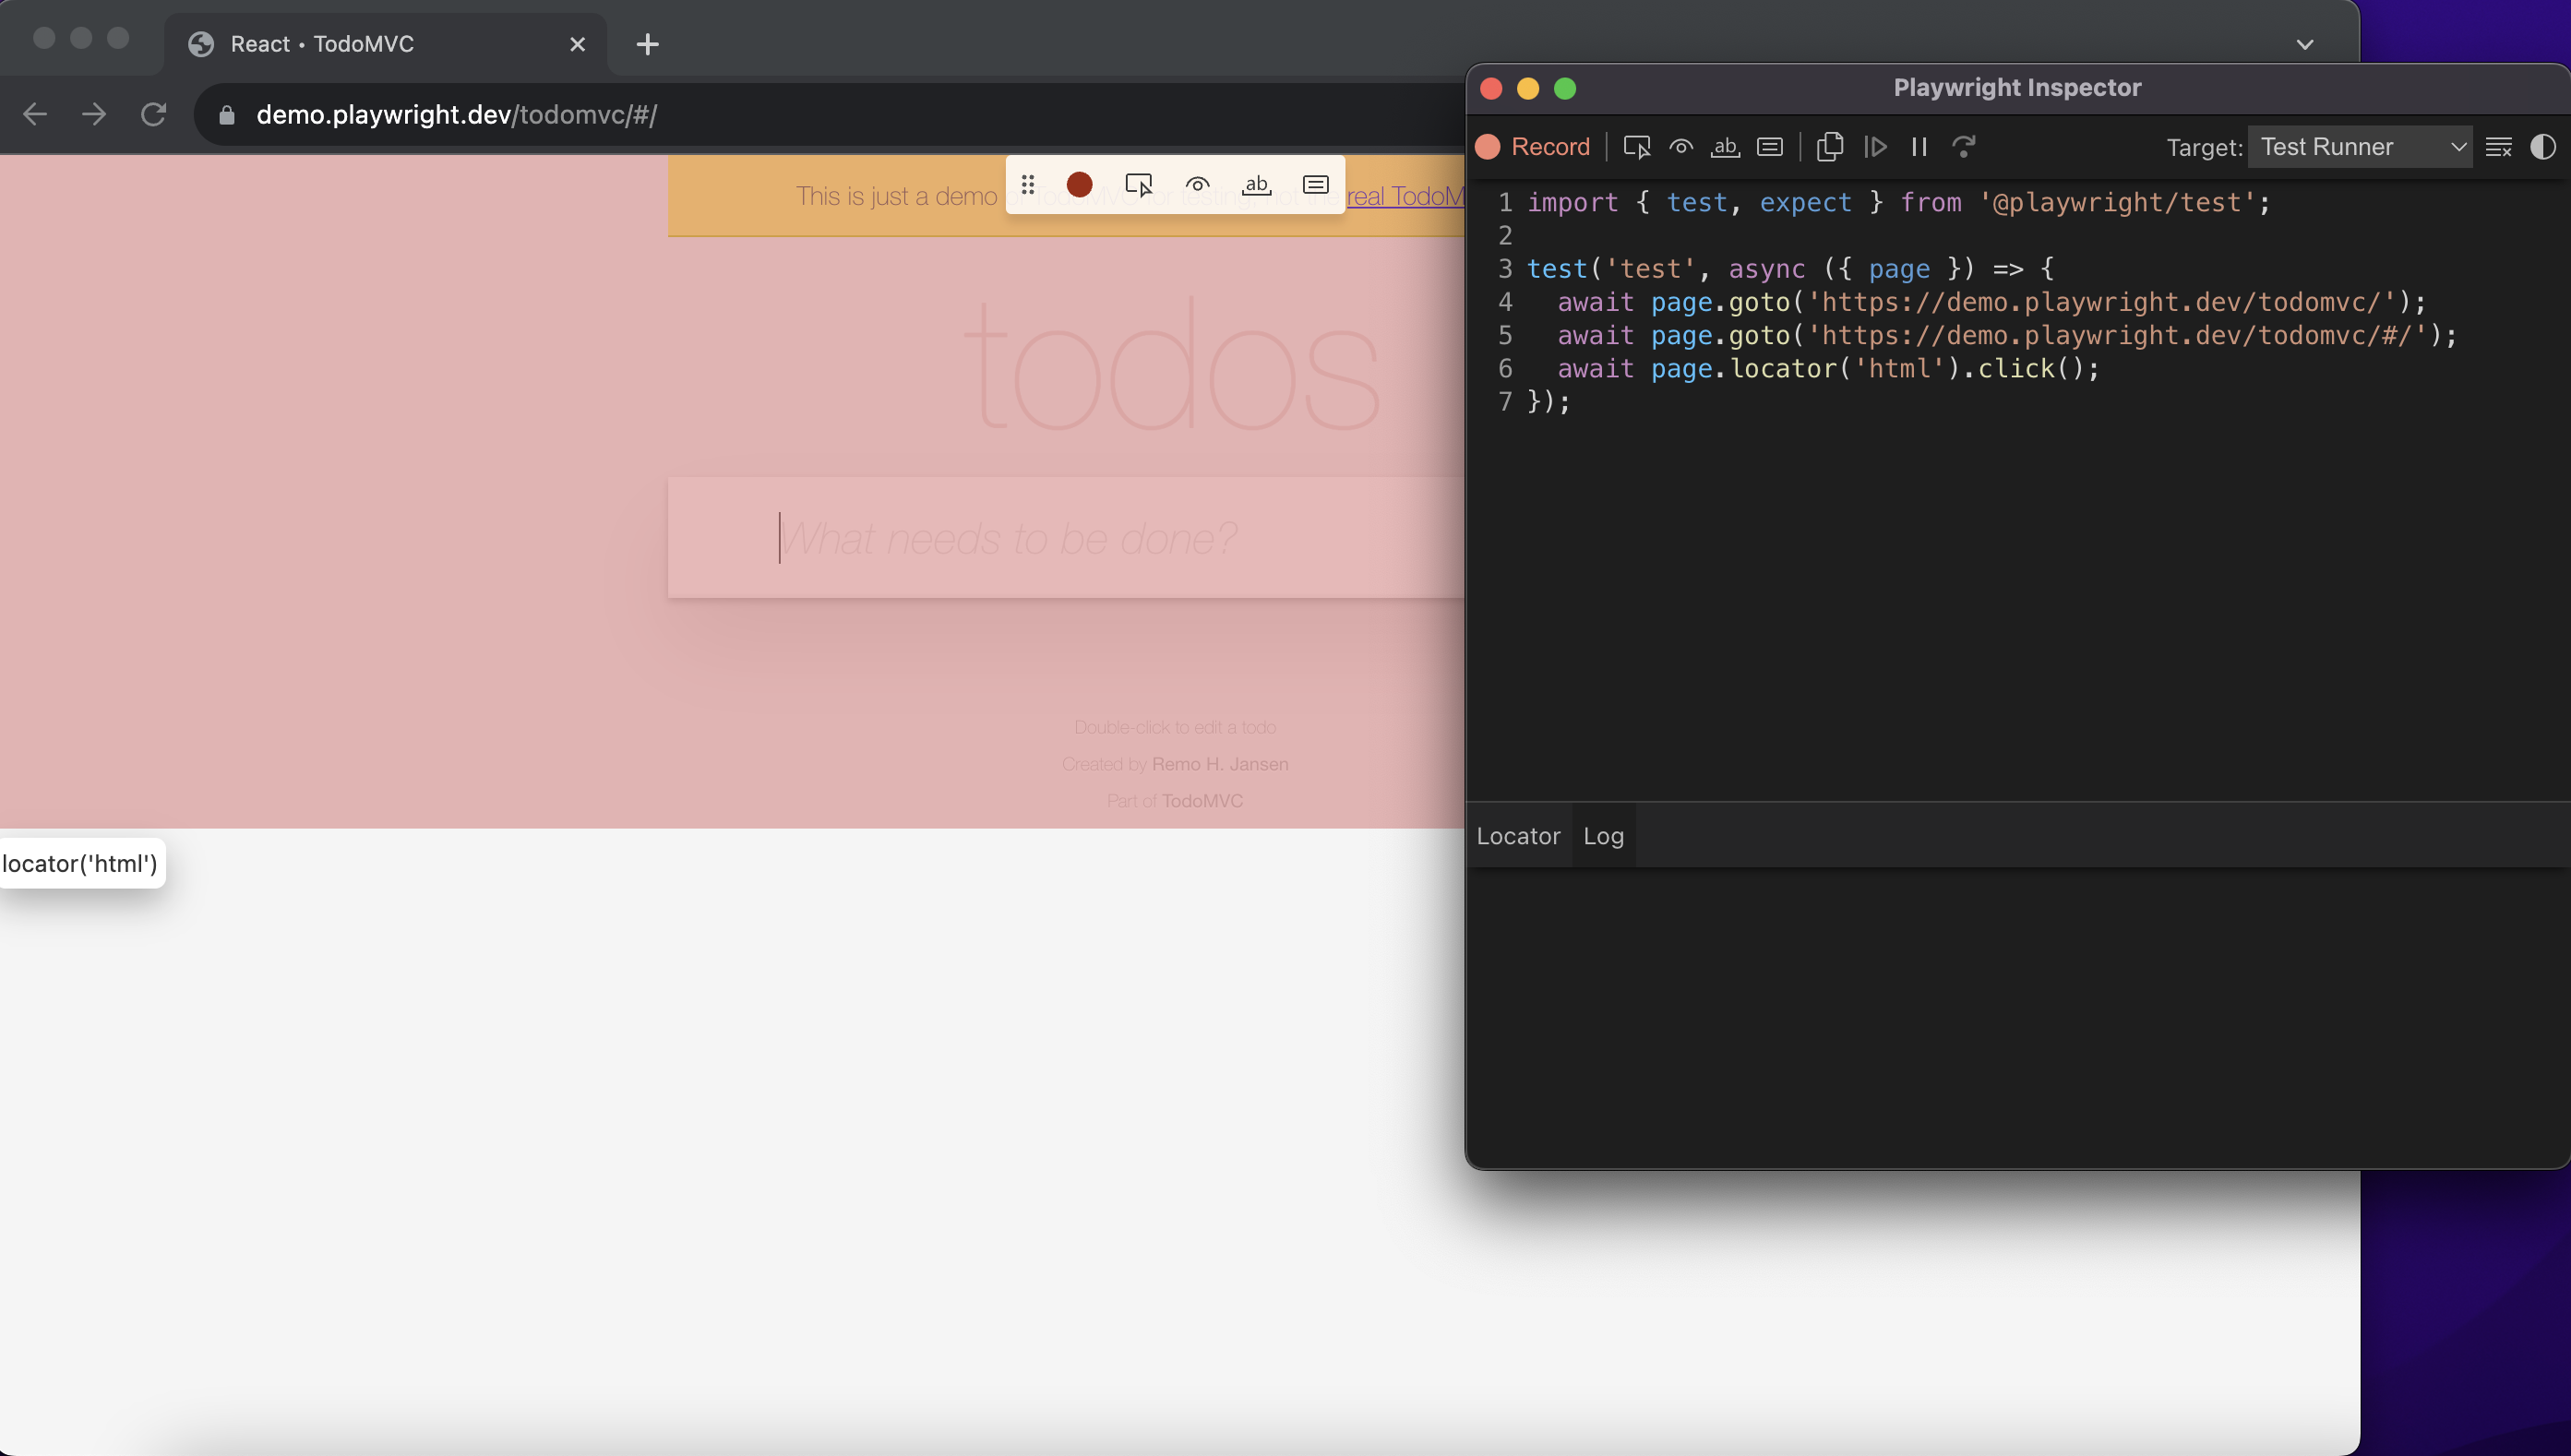
ด้วย Playwright Codegen เราสามารถที่จะ
- บันทึก actions ต่างๆที่เกิดขึ้นบนหน้า Web
- ใส่ assertions โดยคลิกที่ icon บน toolbar และคลิกที่ element ที่ต้องการทดสอบ(assert)
- ถ้าเราคลิก icon รูปดวงตา(Assert visibility) จะเป็นการทดสอบว่ามี element นี้หรือไม่
- ถ้าเราคลิก icon รูป ab(Assert text) จะเป็นการทดสอบว่ามีข้อความตามที่เรากำหนดหรือไม่
- ถ้าเราคลิกที่ icon รูป message(Assert value) จะเป็นการทดสอบว่า element นั้นมี value ตามที่กำหนดหรือไม่
Playwright กับ VS Code
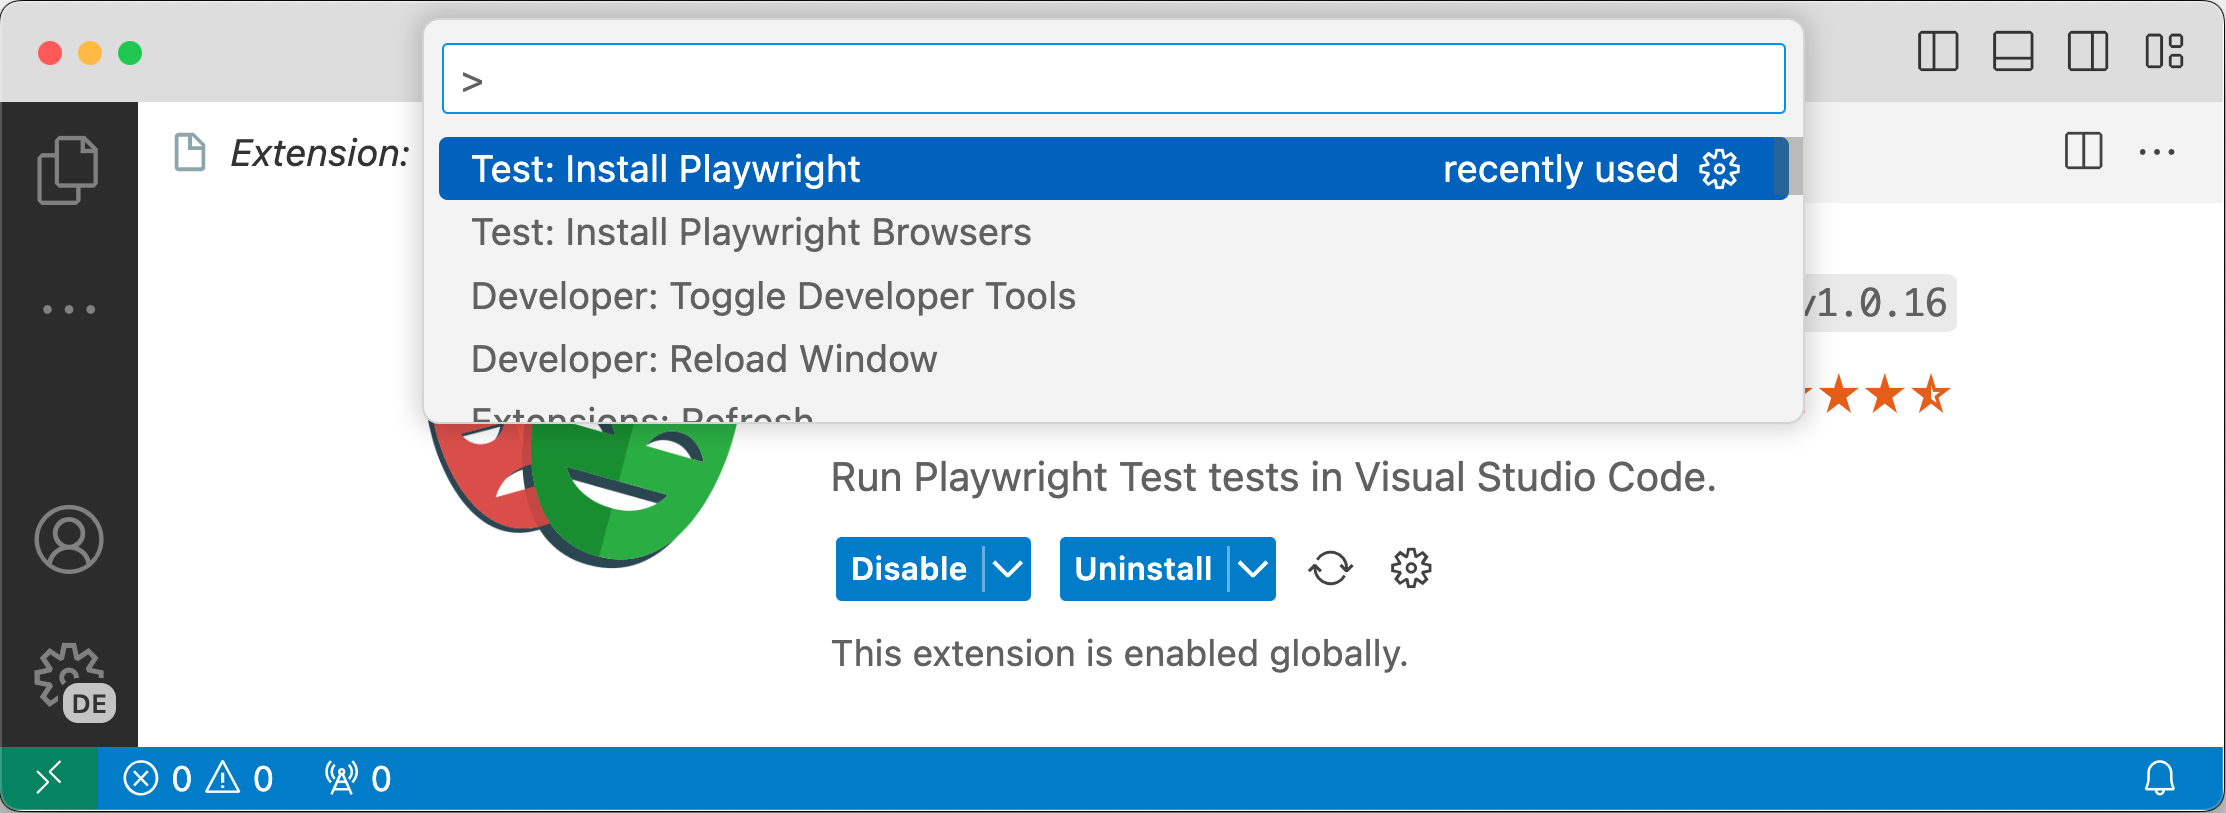
เราสามารถใช้งาน Playwright บน VS code ได้ด้วยการติดตั้ง extensions ชื่อ Playwright Test for VSCode

หลังจากนั้นเราจะสามารถ ติดตั้ง playwright browsers ได้ โดยกด Ctrl + Shift + P แล้วพิมพิ์คำว่า install playwright ดังรูป
นอกจากนี้คุณยังสามารถทำการ Debug playwright ได้